Back last Summer when we were beginning to plan the nursery, Chris found this great idea for an art project to display our daughter-to-be's name above her crib. We loved how small children could help with the project and how the resulting art would be colourful, eclectic and inexpensive. So, we decided to embark upon the project ourselves! And we're so glad we did - check it out!
Not too shabby, huh?
We ended up following the materials and steps in the original post fairly closely, but with a few changes. Here's a recount of our approach, with pics!
Materials List:
Canvas Art
Set of 8x10 pre-stretched canvases (one per letter in your child's name). We got ours at the local dollar store, so they were super-cheap!
Tempera paints. Go for at least the three primary colours and white, as you can make other colours from these.
Paint brushes of different sizes/thicknesses
Stamps, cookie cutters, stickers, etc. to accent the art. We ended up just using stickers.
10-12 small containers for holding/mixing paint
A big plastic tablecloth/sheet to make things less messy! (optional :)
Budding artists!!
Letters
Set of wooden letters spelling your child's name. We got these at the dollar store as well. They were unfinished, which required the other items on this list. If you feel like splurging & saving some time, you can purchase finished & primed letters instead.
Sandpaper (both coarse and fine)
Low-VOC primer
Paintbrush
Putting it all together
Thumb tacks (two per letter)
Zip ties (one per letter)
Screw hooks (two per letter)
Picture hooks (one per letter)
Measuring tape
Patience :)
I know - looks like an involved project, but pretty straightforward once you gather everything together and get started.
Steps:
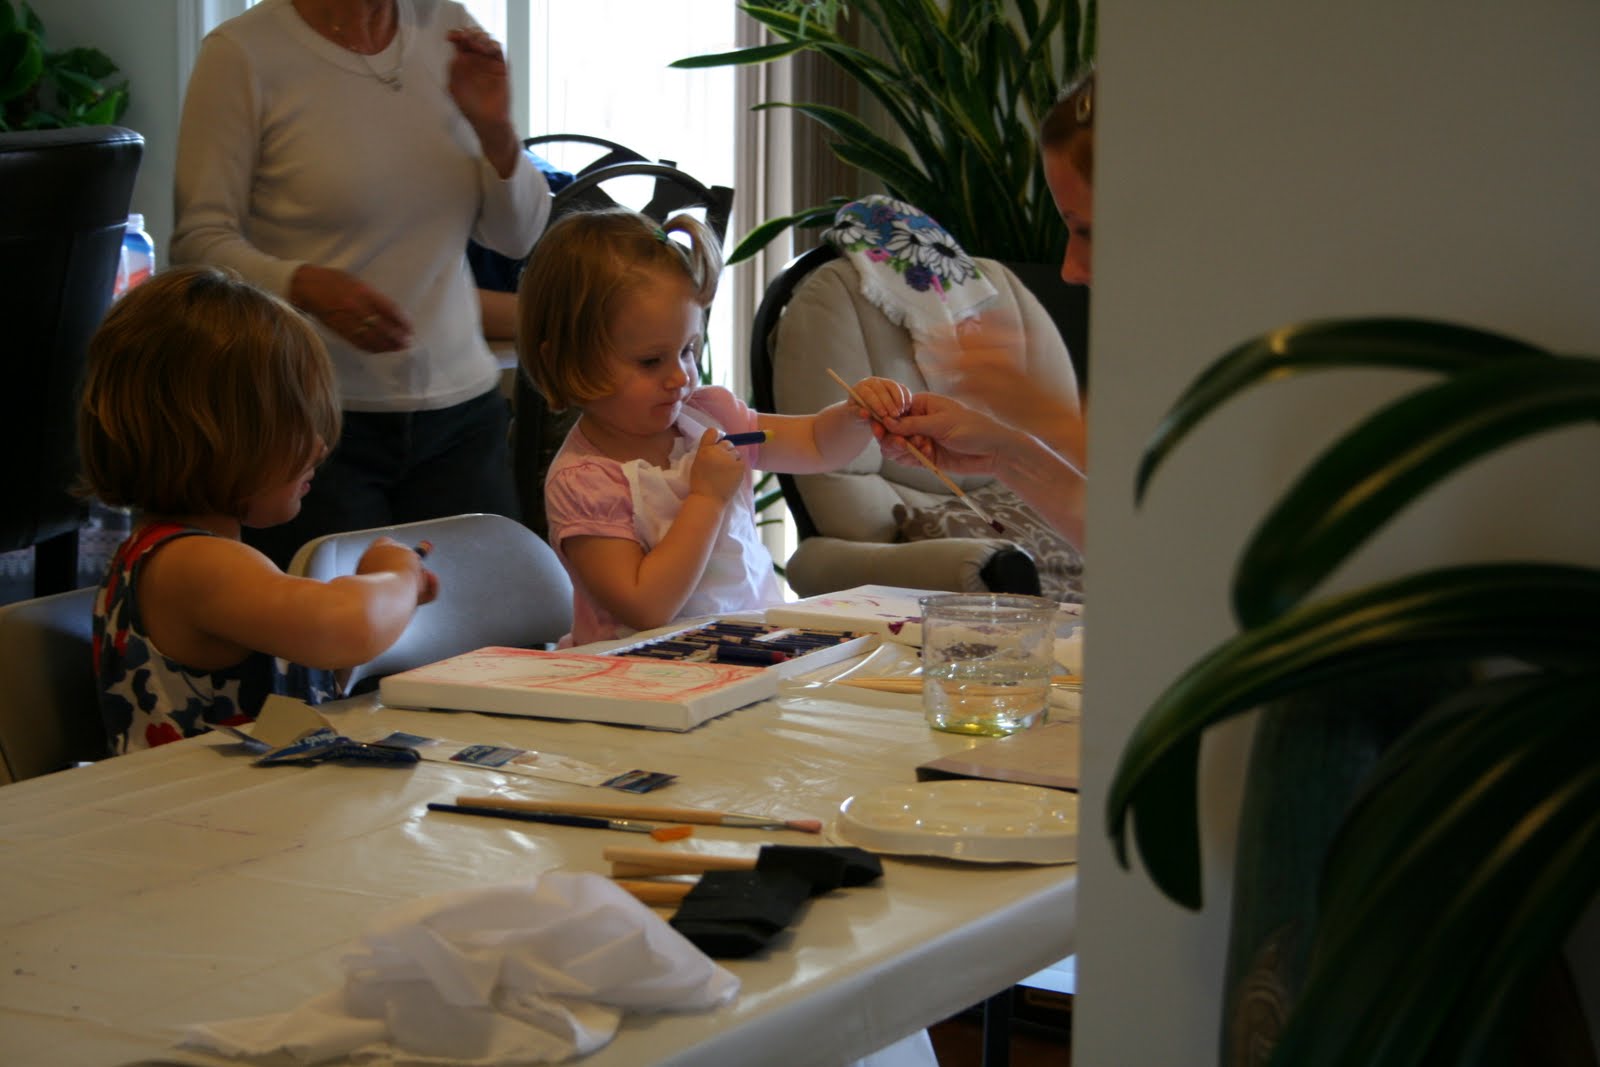
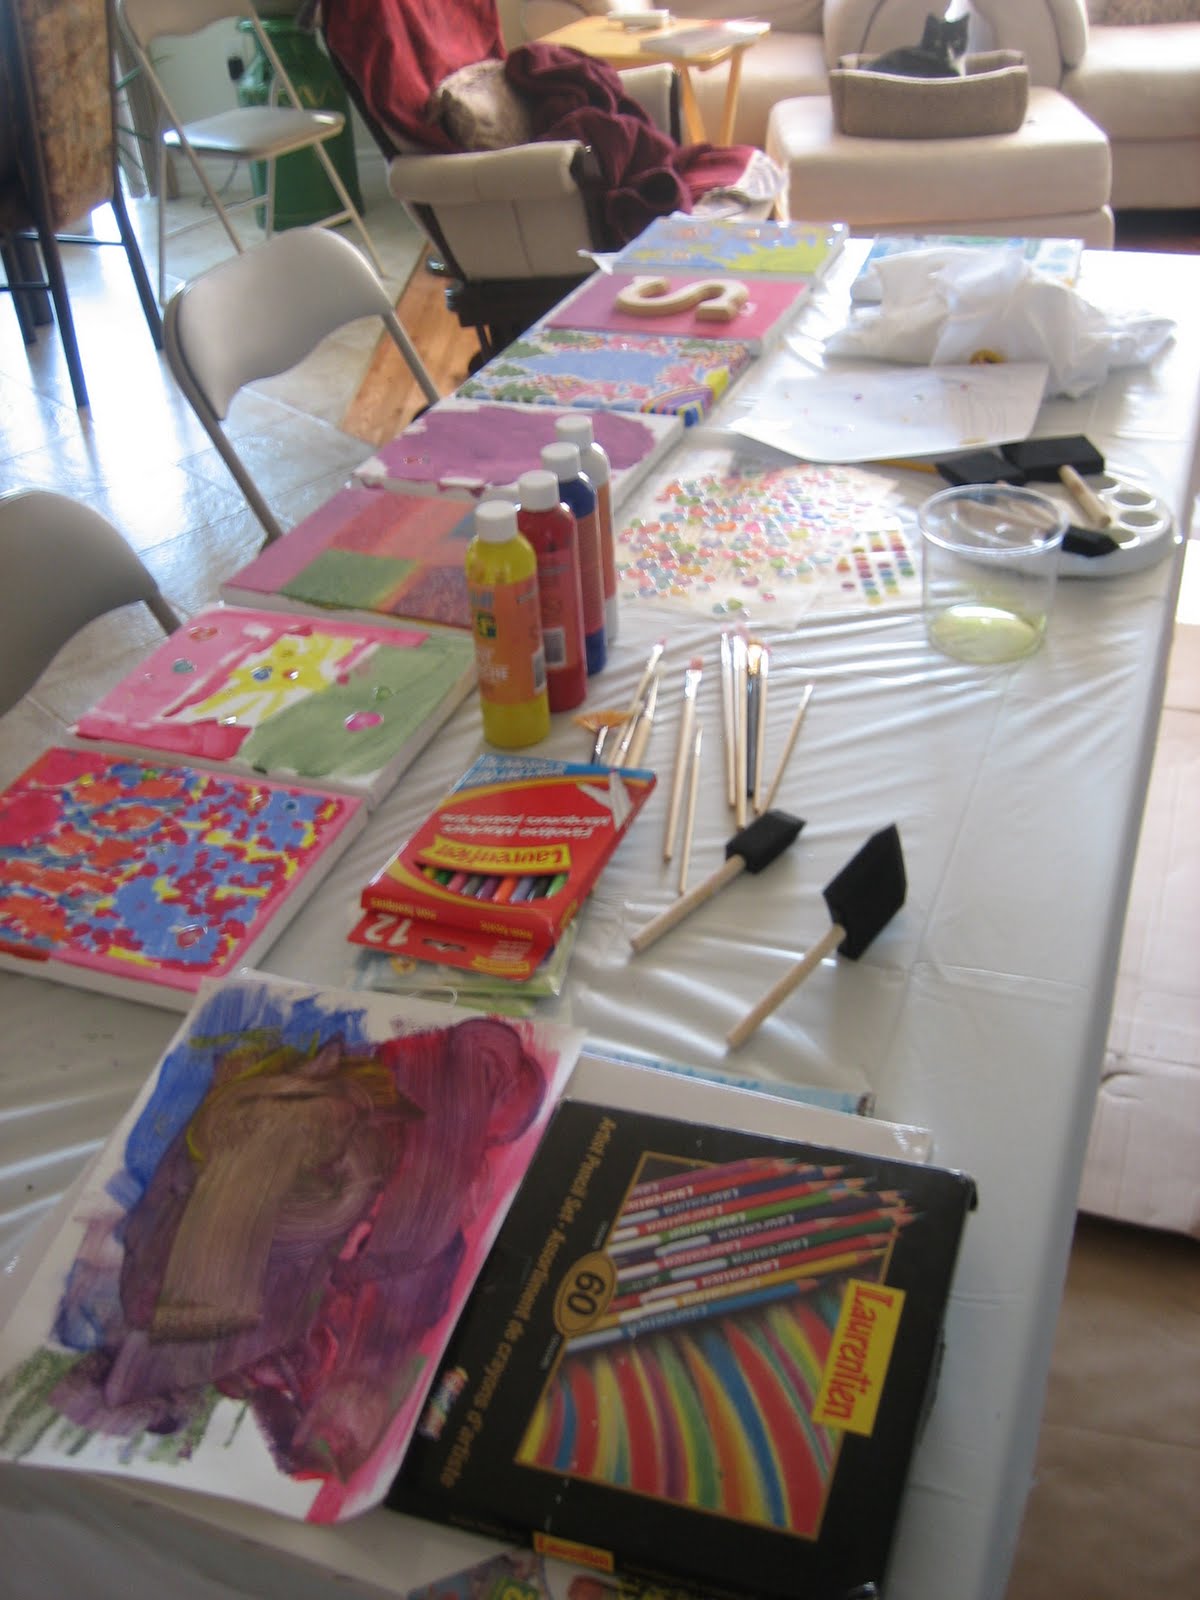
1) Plan an Art Day to decorate the canvases. This is definitely the fun & easy part. :) Invite some budding artists, set up all the materials on a big folding table (covered with a plastic sheet if you so desire) and provide minimal instruction. We invited Chris' family over, including S's (then) 2 1/2 and almost 5-year-old cousins! Everyone who came finished one canvas, which resulted in some wonderful variation in designs, colours, etc.
Tracey, Anne Marie and the kiddos let their creative juices flow at the big table!
Meanwhile, Chris' mom settled in at the breakfast bar, creating an intricate masterpiece. :)
While the finished canvases dried, we teased everyone with a lone "S". Although they guessed away and pried for more hints, that's the only one they got. :)
2) Sand the letters twice (with coarse followed by fine sandpaper). (Skip this step if you purchased finished letters.)
3) Paint the letters with the primer. Use a second coat if desired. (Skip this step if you purchased finished letters.)
4) Assign letters to canvases. You may find (like we did) that some canvases work better with particular letters so that key design elements are visible.
5) Attach letters to canvases using thumb tacks. For each canvas, first center the letter and then secure it with two tacks - one at the top and one at the bottom of the letter. The tacks should easily slide through the back of the canvases and into the letters, however if you prefer to use a different approach, you could use an adhesive such as Liquid Nails (see original post).
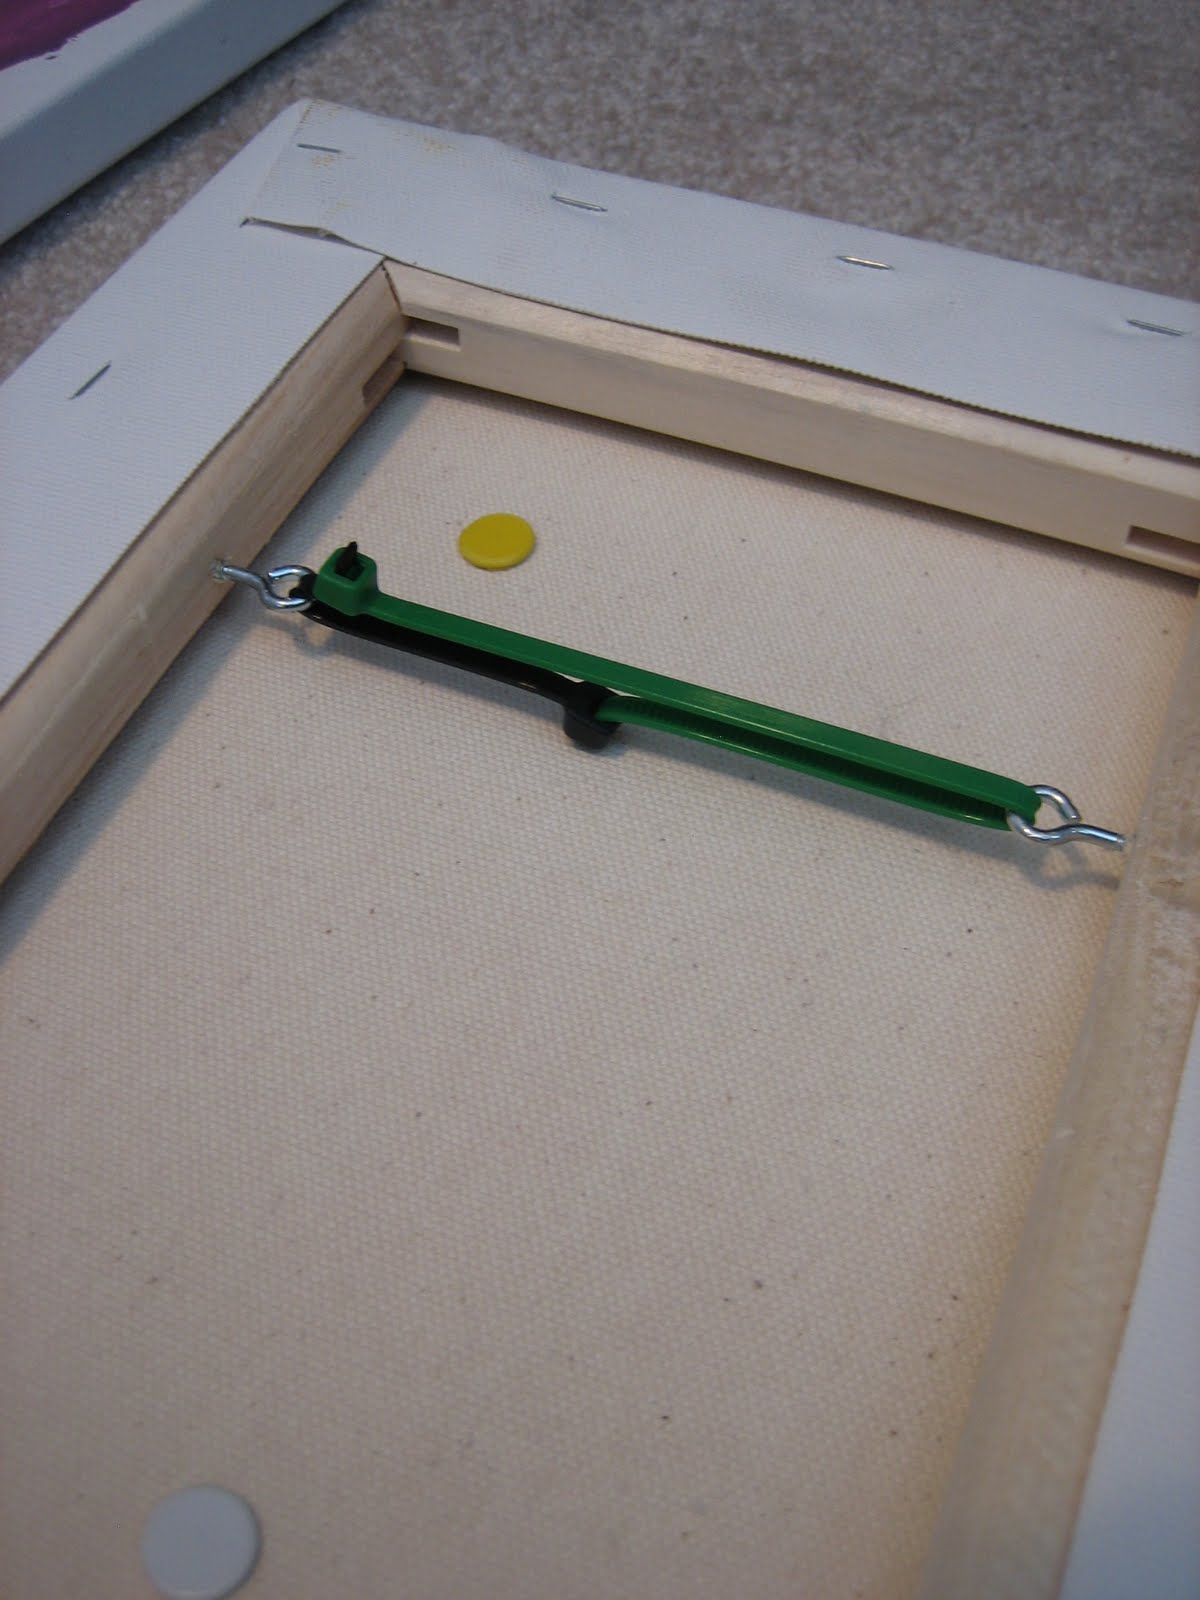
6) Insert screw hooks and zip ties into the backs of the canvases. Note: if you prefer a different method of hanging your canvases, go for it! However this is the approach that worked for us.
7) Measure distances (optional - feel free to just eyeball if you're good at this) and hammer picture hooks into wall.
8) Hang canvases.
9) Step back and admire the finished product!
Definitely a memorable project! I hope this inspires others to embark upon it as well!
What about you? Care to share any baby and/or home decor related Do-It-Yourself projects of your own which had amazing results?
OK I'll admit it. Despite many recent strides toward leading a healthier lifestyle, I've become totally hooked this Summer on something not so nourishing: McDonalds iced coffees.
I can't help it. The'yre delicious and they're "only a dollar, all Summer!"
To be fair, I do make some customizations to my version so it's less unhealthy. Milk instead of cream (woot, extra calcium) and half the syrup. So I don't feel too bad about having a large one about every other day. :O
My teeth, however, aren't too happy about this. If I'm not super diligent with coffee and tea, the front ones get stained. And needless to say, I haven't been too careful, so I now have a mid-August appointment booked with my dentist to polish 'em back to their normal pearly white state.
There's also this Mom & Pop ice cream shop down the road called Swirls which makes soft-serve treats (similar to DQ) but using REAL ice cream - not ice milk. So they're fattier, but much richer, creamier and tastier! And everything at Mom & Pop Shop prices. FTW! I love their "Razzle" - the Swirls equivalent of a Blizzard. Let me just say they do NOT skimp on the toppings!
I'm super excited to be finally writing a complete review of the Bummis Organic Cotton Diaper Kit. Why? Well, in a nutshell, it is possibly my single favourite product we own for S. A lofty statement indeed, but if you read on you'll find out why!
First of all, rewind several months. I knew I wanted to cloth diaper our baby-to-be from about midway through my pregnancy. Following a huge amount of research and changing my mind several times, I decided that prefolds and covers were the approach I wanted to take. The Bummis Diaper Kit claimed to contain everything needed to get started with cloth diapering, it was produced by a reputable Canadian company and existing reviews were generally very favourable, so I decided to order it (in the Infant size). Read more about why I made this decision, including the benefits of using prefolds and covers, here.
Fast forward to the present. We've now been using the kit for 7 1/2 months, and although we've had the opportunity to try many other types of great cloth diapers and covers via purchases and giveaway wins, our Bummis prefolds and covers continue to be our "go to" diapering system for S, and we've made heavy use of the accessories as well! We've also been "lucky" in that S is a small, skinny baby (just 15 pounds at 7 months) so she's been able to use the Infant kit longer than the average baby. She's just starting to grow out of it now.
Alright, let's take a closer look at what's inside!
Bummis offers two versions of their kit - Infant (8 to 15 pounds) and Baby (15 to 30 pounds). Both have similar contents but different sizes and numbers (in some cases) of the various items. The Infant kit contains the following core contents:
We also received a couple bonuses in our kit - a Snappi fastener and a sample of Dimpleskins Bum Bum Balm - nice little add-ons! It looks like Bummis is now collaborating with Rockin' Green and (in the near future) Earth Mama Angel Baby to include samples from these other great companies moving forward. Sweet!
All in all, buying the kit results in a savings of over $40 compared to buying all the items individually. So you're basically getting the fabulous wet bag and fleece liners for free! Plus, then you get to feel like a little kid on Christmas morning cracking into the big box and checking out all the fabulous loot! ;) Take a look at the goodies from my kit! (Note - the diapers & liners on the left aren't from the kit; they're AMPs which I bought to add some pocket dipes to our stash.)
Let's look at the specific items in the kit in more detail, starting with the prefolds and wraps.
Bummis prefolds are made of organic cotton (4 x 8 x 4 layers thick). As is standard with most prefolds, they do need to be prepped before using. I found that about 4 hot water washes got the job done. After prepping, the more they are washed, the softer and more absorbent they become! I can say this with confidence as after 7 1/2 months of regular use and laundering, mine have never been more luxurious! Here's a photo of one taken a few weeks back - nice and plump, and no flaws!
Both feature hook & loop (or aplix) closures and laundry tabs
Both are machine washable and dryable
Both have durable waist & leg elastic
Both feature polyester inner layers (SWW has two and SB has one) and a waterproof laminate outer layer
SWW is the "heavy duty" cover whereas SB is trimmer and lighter weight
SB features leg gussets
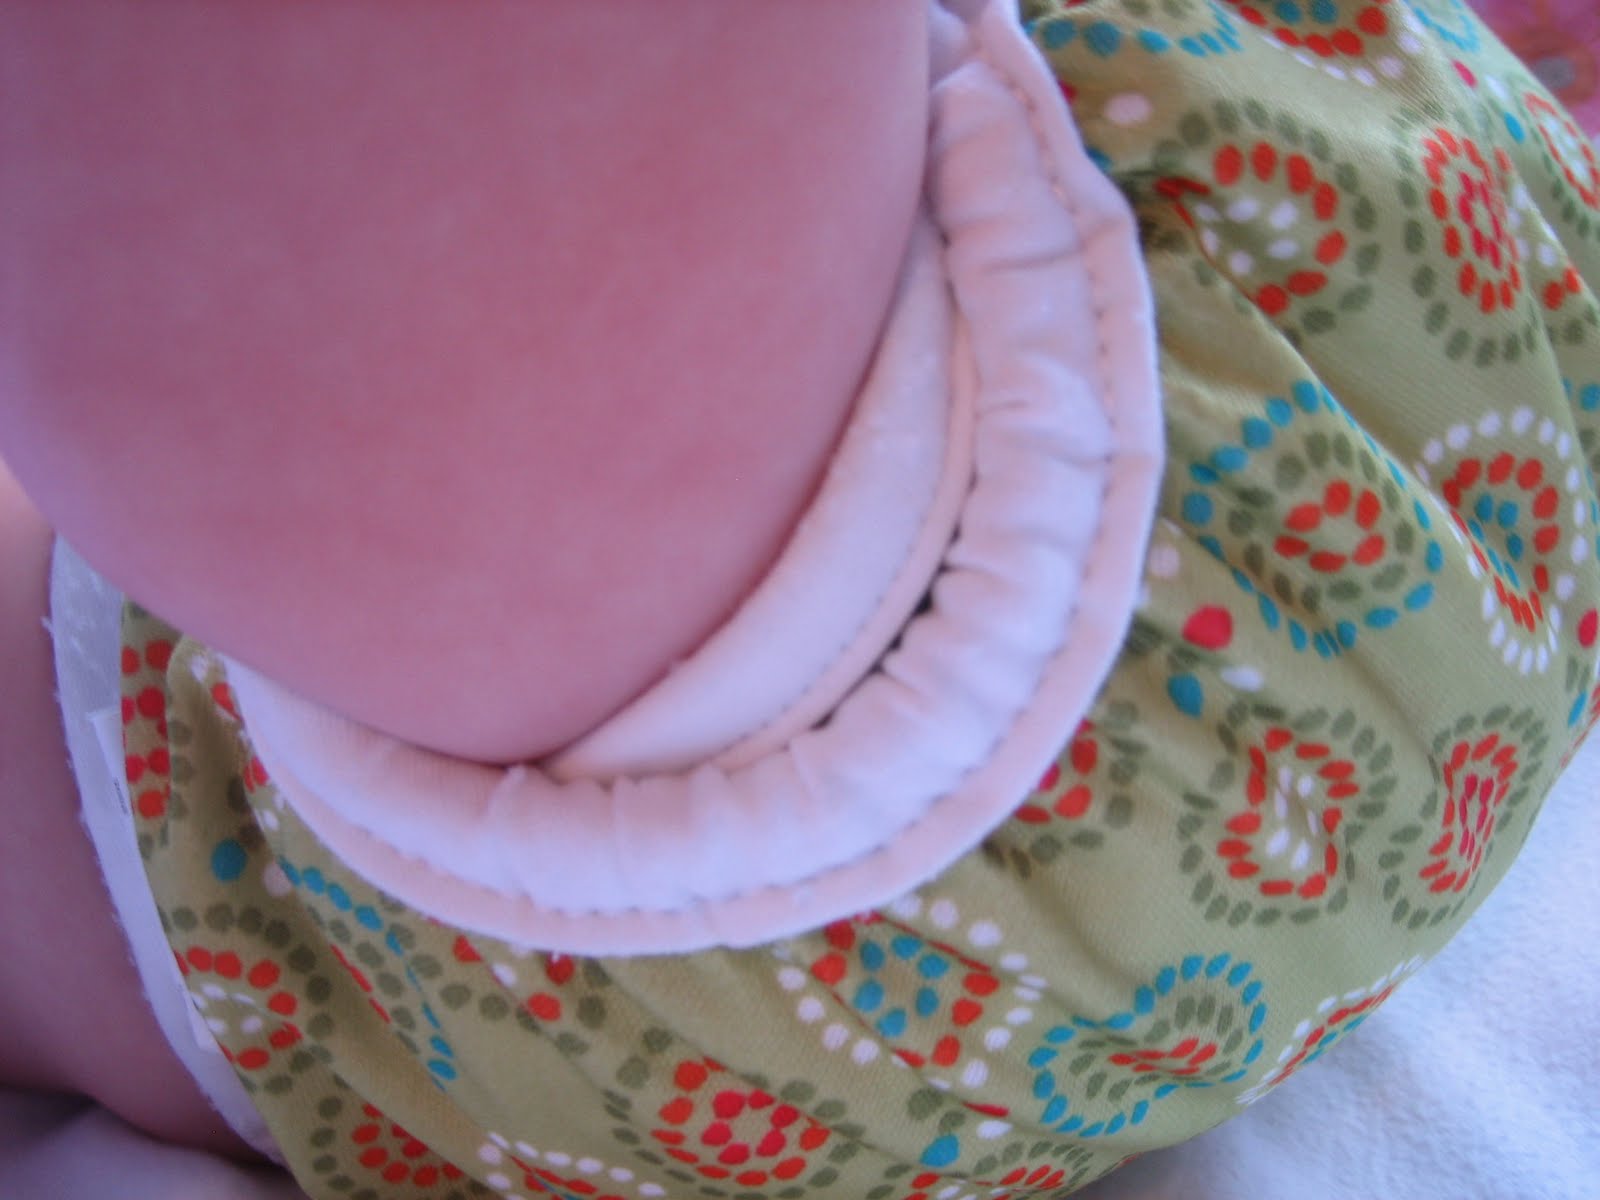
Close-up of a Super Whisper Wrap - front view:
Close-up of a Super Brite - front view:
Close-up of a Super Brite - leg gusset:
Close-up of a Super Brite - laundry tab:
Both wraps work well with many different prefold folds. During S's first 5 1/2 months when she was EBF, we used the "angel wing fold" with a snappi which helped contain the runny poop quite well. I'd guess that poop got out on the cover only about a quarter of the time, and we had just 2-3 total incidents of the poo actually leaking out of the cover. That's pretty effective! Here she is at 5 1/2 months old with an angel winged prefold:
....and topped off with a Super Whisper Wrap!
We did find that with the angel wing fold, we needed to tuck the edges of the prefold under the leg elastic and that this was easier with the Super Brite wrap due to the leg gussets. But it worked pretty well with the Super Whisper Wrap too; we just needed to tuck it in a little further.
Now that S is on solids and her poop is no longer runny, we simply trifold the prefold into a cover. This is even easier than using a snappi, and works very effectively! The one downsize of this approach is that the prefold tends to bunch at the front when she crawls, and this has caused a leak a couple times when her diaper got really wet. (Which is human error, really, since we shouldn't be letting our babies' bums get really wet, right? :)
All in all, I really like both types of wraps. They fit snugly without leaving waist or leg marks, the aplix is strong and the prints are cute! I especially like the Froggy Pond as I used to collect frogs when I was young (both statues and real ones :). On this note, however, I did find myself initially wishing that a couple more printed wraps were included, as 3 of them in my kit were plain white. However, I've since second guessed this as white wraps are nice when S's wearing a "busier" outfit so there's no clashing of prints. Two white wraps (one SWW and one SB) would probably be ideal. One more thing to know about the wrap selection is that the kit is gender-neutral so you won't see any flowers or trucks. I was OK with this myself, but it might be nice if Bummis offered gender-specific versions of the kits for those people who would prefer this.
And finally, the best thing about the wraps? They are incredibly durable! After 7 months of regular usage, the only noticeable wear is superficial, and the aplix is still working perfectly. The following recent photos demonstrate this.
One of my Super Whisper Wraps - still in great condition overall!
Close up of the aplix - just a little pilling but otherwise working perfectly.
Leg gusset of a Super Brite - probably the worst pilling site on all the diapers, but still not all that bad.
I am confident that these covers will last through a second child, if not more!
Let's move on to the other items in the kit.
Next up are the fleece liners. Such a simple item, but very useful for a couple purposes:
Keeping baby's bum dry - these liners add a layer of dryness which is especially nice if baby's bum is a bit red and/or you suspect a diaper might need to be on a little longer than usual. This is the purpose I use them for.
Keeping product off the diaper itself - for example, if baby has a bad rash and requires a cream which isn't cloth diaper friendly. Luckily we haven't needed to test this out with S - knock on wood!
Liners are simple to use - just lay flat in the middle of the unfolded or folded prefold (depending on the fold). Here it is on top of a trifolded prefold:
Next up, the bio-soft liners. The main purpose of these is to make messy diaper clean-ups easier, as you can simply flush the liner with the poop, and if you're lucky, the diaper is spared! I just started using these recently, as they're not too effective when baby's EBF as the poopy diaper can just be thrown right into the washer and the liner wouldn't contain the liquidy mess anyway. And then when S started solids, she was quite irregular so I'd be going through a LOT of liners on pee-only dipes if I used them then. Now that she's pooping around twice/day, they make more sense. That said, they essentially mimic the function of a diaper sprayer, which we have, so I feel like it would be a waste to use them at home. They did come in handy during our recent cottage trip, however. They get the job done pretty well, though sometimes they can get bunched up (particularly when baby's being really squirmy!)
And last but certainly not least, the extra large fabulous wetbag!
This might just be my favourite item in the kit! First of all, it comes in the same awesomely psychadelic prints as the Super Brite covers so it looks great. Secondly, it features two closure mechanisms - zipper and drawstring - so you have a couple stink-containment options. Third, you can either hang it or use it as a pail liner, so you have some added flexibility here as well. Finally (and most importantly), it is big and strong enough to store an entire 2-3 day stash of dirty diapers!
I liked my bag so much that I bought another just like it! (Found a great deal on Kijiji, heh.)
We use ours as a hanging wetbag. Chris simply attached some hooks into the side of S's change table and voila - perfect place to hang!
So that wraps up (no pun intended ;) all the main items in the kit. I know this review is getting quite long already, but I wanted to cover a couple special topics before finishing off.
First of all, laundry. With 24 prefolds and 6 covers, you can go about 2 days between laundry cycles. I did this for a couple months before I bought some additional covers and diapers which allowed me to stretch to 3+ days. Laundry itself is super-duper quick and easy with the Bummis system! On laundry day, I simply haul the full fab wetbag down to the washer (which is when I really appreciate how strong it is, because it gets HEAVY with all those pee and diaper-sprayed poo dipes!), follow our laundry routine (which I've since made some minor adjustments to, namely switching to Rockin' Green detergent), fold and store! Folding is really quick with prefolds; just fold'em in half and stack. No stuffing of pockets or fiddling with snap-in inserts required! Plus, you can wash more diapers at a time with this system than with pockets or AIOs. But I digress. (I have to keep reminding myself that I'm reviewing the Bummis Diaper Kit, not prefolds in general. ;)
Secondly, night diapering. Admittedly, I don't use my Bummis prefolds and covers for night diapering; I bought separate dipes dedicated to this. However, for the purposes of this review I tested their night diapering mettle on two separate nights with two different prefold folds - the angel wing and the trifold. In each case, I placed a liner down the middle to help keep things dry. And guess what? Amazingly, no leaks! The prefolds were pretty soaked each time but the trusty Bummis covers kept everything in! Now admittedly, S isn't a super-heavy wetter so results may not be as good with this system for babies who are, but in that case an extra soaker pad might get the job done.
So that's that! For those in a hurry, here's a quick summary of pros & cons:
Pros:
+ Truly contains everything you need to start cloth diapering!
+ Economical diapering option; prefolds/wraps are affordable in general, plus you save over $40 by purchasing the kit vs. buying the items individually
+ Prefolds/wraps fit well on baby and don't leave marks
+ Very few leaks using this system
+ All reusable items (prefolds, wraps, wetbag) are high-quality and long-lasting
+ Fabulous wet bag is, indeed, a fabulous way to store dirty dipes in between laundry cycles
+ Laundry is very efficient with this system
Cons:
- The kit is currently offered exclusively with gender-neutral patterns (a limited number) and two of their available wrap types. It might be nice if gender-specific kit versions and/or more variety in the wraps could be available.
- Babies at the high end of the growth chart may outgrow the Infant kit quickly as it's designed for babies up to 15-16 pounds. However in this case, it should last through even more additional children!
Buy It!
To get your own Bummis Organic Cotton Diaper Kit (Infant or Baby size), you can use this handy-dandy form on the Bummis website to find an online store or a local retailer in your area which sells the kit.
...Or, if you are lucky, you can Try Before You Buy! (GIVEAWAY ALERT! ;)
Before writing this review, I contacted Bummis to let them know that I loved their Organic Cloth Diaper Kit and that I planned to review it on my blog. I asked if they would like to sponsor a giveaway along with the review, and they generously agreed to do so! Thanks Bummis!! :D
One lucky Manager to Mom reader will win a Bummis BeautifulBASIC consisting of three organic cotton prefold inserts and one wrap! Winner selects size (infant or baby) and gender (unisex, girl or boy).
To enter, please fill out the Rafflecopter form below. Comments do not count as entries, however feel free to add a comment to remind yourself that you entered! If you have questions or are experiencing issues with the form, please comment or email me as well; this is my first Rafflecopter giveaway so I want to ensure I iron out any kinks ASAP! Thanks! :)
Disclosure: The prize is being provided and shipped to the winner by Bummis. I received no financial or product compensation myself for writing my review or offering this giveaway. This is my completely honest opinion above and may be different from yours.
Well, I didn't Menu Plan last week because I was pooped from vacation, the almost record-setting heat and a kidney infection, and I won't really be doing it this week either as Chris is in Toronto for the majority of the week. But I did, at the very least, manage to whip out this dish to take to a pool party / BBQ at my Aunt & Uncle's place today.
If you're into healthy, vegetarian, garlic-y dishes and you haven't made Tabbouleh Salad before, what are you waiting for? This dish is tasty, super-easy to make, and although not traditional, the addition of chickpeas adds some solid protein and substance to the dish. And it's nice & light - perfect for those hot, Summer days!
I know there are a million of these recipes already floating around the interwebs, however here's my version, complete with pics (but of course!)
Tabbouleh Salad with Chickpeas
Ingredients:
1/2 cup bulgur wheat
2 large tomatoes with seeds removed, diced
1/2 cucumber, peeled and finely chopped
3 spring onions, diced
2-4 cloves garlic, minced or pressed
1 cup fresh parsley, minced
1 tablespoon fresh mint leaved, minced
Juice of 1 lemon
1/4 cup extra virgin olive oil
1 can (19 oz) chickpeas, drained & rinsed
Salt & pepper, to taste
(Note - I used parsley from our garden when I made it today. Unfortunately, it's not growing too well so I only got about 1/2 to 2/3s of a cup. As a result, ours didn't taste quite as "fresh" as it usually does. You really do want to shoot for the whole cup. Oh, and how win is that backwards-c-shaped cucumber? Also harvested from our garden, TYVM! It looks like some sort of green cucumber pacman on the cusp of ravaging its regular-shaped counterpart to its left. Veggie cannibalism?! But, I digress.)
Steps:
Pour the bulgur wheat into a large bowl and cover with 1 cup of boiling water. Stir. Let sit until all water is absorbed (about 20-30 minutes) then fluff with a fork.
Stir in tomatoes, cucumber, spring onions, garlic, parsley, mint, lemon juice, olive oil, chickpeas, salt and pepper.
Cover and chill for 1+ hours (ideally overnight). Let sit at room temperature for 20-30 minutes before serving. Enjoy!!
Well, we're back from our fun & sun-filled cottage trip, and as usual it went way too fast! It's after 12:30 AM so I *should* be in bed, however I thought I'd quickly whip out the post that was percolating in my head during our drive back.
As those of you with kids would surely agree, travelling and vacationing with babies (and older kids too, I would certainly imagine!) is quite a bit different than with adults exclusively. While we got a taste of this during our weekend trip to Picton, it really hit home during our cottage vacation. As such, I thought I'd share some of the lessons we learned and helpful tips we discovered!
Scheduling travel time during baby's sleeping hours is ideal! We decided to leave the Bruce tonight after dinner and S slept the entire ride home. This was a stark contrast to our return trip from Picton during which we frantically rotated toys and busted out every song in the book in an attempt to coax her out of her "I hate being restained in this seat!" crying fit.
Stackable and sortable toys are the bomb. They take up less space, provide a versatile playing experience (so baby is probably less likely to get bored of them) and are sand (and other grime) resilient. S was content to independently play with her stacking cups and Fisher Price shape sorting box on many occasions during our trip!
Getting organized and establishing schedules/routines early on in your trip is super-helpful. For example, if your baby is on solids, find a convenient home for her food & accessories as soon as you can and institute an efficient cleaning routine. I brought along our kitchen wetbag which really came in handy for S's used bibs and wash cloths.
When packing your vehicle, order & accessibility of key items becomes much more important! Food & water, diaper bag and toys (in particular) need to be easily within reach.
Cloth diapering while traveling / cottaging is totally doable - particularly if you have access to a washer. (Otherwise I can see it being much more of a PITA.) I filled one entire suitcase with S's stash, laid out her portable change mat on the couch in our room, threw a pillow on the floor to cushion the knees and voila - accessible and at least moderately ergonomic changing station! :)
While on the topic of cloth diapers, disposable liners are a nice diapering accessory on the go. As my husband put it, a liner is basically a diaper sprayer in another form. :) Although they're not perfect (bunching & whatnot), they can definitely make poopy diaper changes less messy in lieu of said sprayer. (We learned this firsthand at the Timmy's north of Espanola.)
Don't expect to catch up on sleep during your trip! In our case, S nipped any desire for this in the bud by falling asleep later, waking up earlier and napping for shorter stretches. Kind of makes sense as she was exposed to so many exciting new sensations and experiences, but a little exhausting at the same time! Luckily we had many other family members eager to spend time with our li'l monkey which allowed us to get in some R&R!
Finally, if you're like me, vacationing can help you realize that babies are, indeed, quite robust and that a little dirt truly isn't a bad thing. S enjoyed a speedy motorboat ride, splashed away in quite frigid lake water and took advantage of the (decidedly non-pristine) area rugs at each cottage to work on her crawling (and associated face planting). But ehhh - through all that, she's just fine. :)
Anyone have any other helpful tips or lessons learned when it comes to travelling and vacation with little ones? Feel free to share!!
Day 3 at the cottage and it's a rainy one! Since we're stuck indoors anyway, it's a good time to do a l'il blogging!
Last year at the cottage I wrote up a menu plan for the week and it really helped organize our shopping trip and daily meals. So we made another one for this trip. With 7 adults and 2 kids (well 3 including S, but she still has her own meals so doesn't "count" :), it's all about convenience, simplicity (no recipes!) and having plenty to go around!!
The first thing we did was take stock of the meal-appropriate food everyone brought along (meat, pasta, veggies, etc.). We then arranged these into individual dinners, breakfasts, etc. based on factors such as BBQ vs. non-BBQ, mixing things up day-to-day and how perishable each item was. Finally, we filled in the gaps to add in salads, sides, etc. for each meal.These "gap" items, along with breads & cheeses for simple lunch sandwiches (to round out the numerous cold cuts brought along), healthy and non-so-healthy snacks and other items comprised the master shopping list. We ended up spending less than $200 total, and the food should last us the majority of the week - not too bad!
The cottage menu plan actually started on Saturday with Taco Night, which Chris' sister brought the fixings for - a nice, easy and tasty way to start off the week! We me end up reordering the meals from that point onward based on the weather, what people feel like, etc. but we'll use the ordering below as a blueprint.
Oh, and I'm linking up again this week! Check out other MPMs here:
Saturday
- Hard and soft tacos
Sunday
- BBQ - hot dogs, sausages and side salads (coleslaw and pasta)
Tomorrow we're headed up to St. Joseph Island for a week of cottage-y goodness with Chris' family, followed by a ride on the Chi Cheemaun down to Tobermory in the Bruce Peninsula and another weekend of cottage-tasticness with my Mom, stepfather and family friends on Look About Bay. Yay for cottaging!
This will be S's first extended vacation. She did well during our weekend trip to Picton but the drive to SJI is more than twice as long. Due to this, we've elected to head off "dark & early" (4 AM ish) tomorrow morning so that she (hopefully) sleeps for about half of the drive. *Crossing fingers*
I'm bringing my laptop so might get in a li'l blogging during downtime, but will need to play this by ear. Otherwise, we'll be back on the 18th and I'll be posting some great new giveaways starting then, as well as a bunch of other posts I have on the radar. Ahhh time, you continue to elude me...
In the meantime, I leave you with sunset on the Bruce Peninsula. Ahhhhh.....
So early this evening I was out on a nice walk with S. The temperature was perfect, the birds were chirping and the scent of BBQ was in the air. I sang songs to her, she enjoyed the bucket swing at the playground and I gave her various leaves and flowers to hold & explore. Including one which looked like this:
These are all over the place in our area right now - in fields, lawns and parks. Obviously a weed of sorts but actually kind of pretty! S played with it in her hands a bit and then brought it up to her mouth and chomped down. Oops, probably shouldn't allow that, huh? By the time I pulled it away, however, she'd gotten a couple petals into her mouth and was chewing away at them. I tried to fish them out but I'm not sure I got everything.
I chastized myself a bit on the way home, because I didn't actually know what this thing was. Heck, it could have been poisonous. :-/ But I didn't really think much more about it until after S went to sleep (which went fine.) Then, I decided I should check into things further to be on the safe side. I consulted Google Images which suggested that the plant was Bird's-foot Trefoil. And guess what? This stuff IS poisonous!! It contains cyanogenic glycosides which can cause symptoms of cyanide poisoning when digested.
OMG.
Naturally, I kind of freaked out. Googling around a bit more suggested that, if affected, symptoms would appear within several hours. It had been 4-5 hours at this point and S seemed just fine. (I checked on her and she was sleeping soundly.) Regardless, I still decided to call Poison Control. The nice & chatty woman on the other end was reassuring. Like peach pits and apple seeds, she said, S would have had to digest a HELLUVA lot of B-FT to get sick. One or two petals? Pish posh.
So needless to say, I feel better now. And inspired, obviously, to write this post!
I got thinking about our ironies and idiosyncracies as parents. How, often inexplicably, we are conservative about some things and liberal about others, especially when it comes to health and safety-related topics. As this post would indicate, I've been pretty liberal (up until this point, at least) letting our daughter explore nature. Lord knows she has her fair share of man-made toys and functional objects, so I relish the opportunity to expose her to organic matter whenever possible. That said, today was a bit of an eye opener so I'm definitely going to be more careful on this front moving forward.
But let's look at some other health & safety related topics. I'm kind of all over the board when it comes to our daughter. For example:
- Skin, hair and cleaning products - very conservative; I seek out all-natural, eco-friendly products whenever possible. For example, we use Country Save laundry detergent (which is biodegradable and "everything-free") and I'm willing to pay through the nose for mineral-based sunscreen in order to avoid the scary ingredients found in their commercially-available counterparts. Oh, and on a related note, I *really* hate putting a 'sposie on her. I've only had to do it a couple times but it Just. Feels. Wrong.
- Germ exposure - somewhat liberal. While I don't set out to purposefully get my daughter sick, I also don't worry too much about what she touches, who she's around and ensuring that my floors are spotless 24/7. After all, I'm pretty convinced that a little dirt is good for you!
- Solids - somewhat liberal, in terms of the "standard" guidelines on what to eat., I'll give her tastes of what I'm eating at times and I've dabbled around in baby-led weaning. Oh, and I'm definitely not going to wait until 3 years to give her peanut butter! However I'm quite conservative regarding the quality of what she eats day to day. We go organic whenever possible.
Over the Canada Day long weekend, we BBQ'd. A LOT! We also prepared a dish for the annual picnic with Chris' extended family. Since stores were closed on Friday, I ended up doing a mondo shopping trip on Thursday. Although we did make a list, we went with the whole "it's better to have it and not need than to need it and not have it" philosophy, so we inevitably ended up with a lot of leftovers and unused food. So my goal this week is to incorporate as many of these as possible into our meals! We'll also be heading to the cottage this weekend which is even more motivation to clear out the perishables. I'm pretty proud of this menu plan! It includes a few new dishes which sound very tasty, and if all goes well, we should end up with very little or no waste.
I'm also going to be linking up with I'm An Organizing Junkie starting this week, so I can proudly display one of her (many) MPM banners from this point forward! Here we go!
Monday: I'm preparing a few dishes today 'cause some things need to get eaten/cooked stat. Some of this will end up as leftover-leftovers. :)
Lunch: Sausage and egg casserole, amended to include sauteed onion and mushroom as well. A plethora of leftovers are going into this one! Two cooked sausages and 3 flat, multigrain hamburger buns (in place of the white bread) from Saturday's BBQ, the last spicy smoked sausage from the meat keeper for some kick and a handful of the mushrooms from the remaining 680g package we didn't even end up touching over the weekend.
Dinner: Hearts of Romaine Salad w/ apple, red onion and cider vinaigrette. We don't have cider vinaigrette so will probably just use balsamic - hope it gets the job done! This will take care of at least one of the two unused romaine hearts left in the bag. (People just don't put lettuce on their burgers like they used to!) I'm also swapping the pecans for raw almonds as we still have some of these kicking around. Broccoli Rice Casserole. In you go, head of borderline-wilting broccoli! I'm also dicing up and tossing in the shaved ham and turkey we didn't end up using in yesterday's picnic wraps.
Tuesday: Hungarian mushroom soup. Get in there, residual mushrooms! This'll allow us to harvest some of that dill in our garden as well!
Casserole leftovers
Wednesday: Black Bean and Rice Enchiladas. I love enchiladas and haven't made them in awhile. Perfect time, as we have several flour tortillas left from the picnic. I also like that this recipe attempts to be a little healthier, incorporating brown rice and black beans!
Thursday:
Leftover-leftovers! Perhaps toss in a couple of the pre-seasoned Pacific salmon fillets we have in the freezer to bulk up the meal.
Friday:
Polish off any remaining leftovers OR take out / order in; keep it simple before the holidays!
Well, the 2011 Great Canadian Blog Bash (#TGCBB) has come to an end, and what fun it was! Thanks to everyone who entered my giveaway for a $25 gift card to M&M Meat Shops. Kristen (comment #93) was the winner out of 247 total entries - congrats Kristen!
I loved reading everyone's favourite Canadian food comments. As one might expect, frequent mentions included Tim Hortons, poutine, beaver tails, maple syrup and Swiss Chalet! Here's the full list of comments to whet your appetite! :D
There is a local restaurant that our family goes to frequently. Their prime rib is the best I have ever had. Besides the great food, another reason we go is that they donate half of all the tips made to charity. They choose a new and deserving local charity every year. I love the generosity of Canadians. They are always willing to lend a hand in any way they can.
I love the local strawberries that are out at this time of year, and am looking forward to when my son is big enough to go strawberry picking with me. There's something about them that always reminds me of Canada Day BBQ's with friends.
I love wine and cheese, I make my own wine some times. :) I also am a lover of back bacon and lobster, poutine and smores. Can't get more Canadian than that lol
Not entering but how can you mention Canadian foods without mentioning the oddly named but super-tasty pastries... BeaverTails???
omg fresh fruit from Kelowna, it's just drips down your chin!!
I definitely LOVE the *VERY* healthy Canadian poutine :D And I love Timmie's Iced Capps, yum yum :)
I am completely addicted to Tim Hortons coffee. I would rather have a one cream/one sugar coffee than any other drink! Mmm Mmm
Ohh a fave Canaidian food...Does Shaw's icecream count? :)
Back bacon
Canadian Lobster from the east coast is food I like the best.
I really love Beaver Tails! Whenever we are in Ottawa, we will go and buy it!
I love Maple Syrup!
my fave Canadian winery is Mission Hill in Kelowna BC
I can't ever get enough of Tim Hortons coffee! Yummy!
It's Tim Hortons sour cream glazed donuts that I love the most!
POUTINE!!!!
Mmmm... who doesn't love a great poutine?
Wow ~ where do I start! I love poutine ~ with chunks of chicken added ~ to-die-for! I also cannot go without my Timmies in the morning and wanting to try the 2 new timbit flavours ~ hopefully this week! The cheese festival sounds fantastic and with a little vino makes the day just perfect.
I love timmies iced caps. No summer is complete without stopping at tim hortons to pick one up on the way to the lake
My favourite Canadian things are poutine, Tim Hortons, and maple syrup!
My Fave Canadian food has to be POUTINE! I mean, how can you not love cheesy, gravy goodness, right? YUM! Happy Canada Day!!
I'm from NB Canada and when I moved to NS for 5 years the thing I missed the most was Garlic fingers with Donair sauce... I missed it so much lol. Thank goodness I moved back to NB and have not craved it since lol.
I love me some poutine and beaver tails!
I love the Winona,Ontario peaches.Every year we go to the peach festival and get a peach and strawberry sundae.
poutine!
poutine!!! nanaimo bars!! :)
My favorite Canadian restaurant is Swiss Chalet
Can't go wrong with a Timmie's Ice cap! :)
I've been liking Timmy's Iced Coffees lately!
bwahaha! timbits flavour?! LOVE it!
I'm an old-fashioned glaze girl!
I Love poutine!
I love poutine!
I love our local farmer for their fresh Canadian produce
I love beavertails :)
Love timbits
I love my Tim Hortons (Timmies)
The honey glazed and chocolate Tim Bits are my faves!!
Mmm Timbits..... crueller timbitss
My favourite Canadian restaurant is probably Swiss Chalet, and of course I love all my local Niagara wineries!
Well I love my timmies but the Maple Leaf Restaurant is great too although I haven't been there in a long time.
One of my fav. Canadian "foods" is Dieu de Ceil smallcraft beer from Montreal. Worth planning a return trip. Yum.
I also heard back from all three companies I featured on my TGCBB giveaway post: Black River Cheese, Empire Cheese and The Sprucewood Handmade Cookie Company! Based on their responses, I'm thinking we'll need to take another foodcation in Prince Edward Country!
From Black River Cheese: Thanks for this! We are so glad you like our cheese and that you were so taken with Prince Edward County as well. We're pretty proud of our community. If you come to the county again, be sure to stop by our Retail store for a great selection of our award winning aged cheddars and flavoured mozzarellas as well as lots of other 'County' products. And our cheese is available in many Metro Stores and Sobeys stores as well as specialty shops from London to Ottawa and north to the Kawarthas. We will be revamping our website in the near future and plan to list the stores where you can find our cheese. Also, generally we make fresh curd on Tuesday, Thursday and Saturday so if you come to see us, make sure to get some!
From Empire Cheese: Thank you for the kind words in your blog about Empire Cheese. You should consider a trip to Trent Hills (made up of the communities of Campbellford, Warkwarth and Hastings). You could visit the Empire Factory and purchase the freshest curd and then visit Sprucewood Cookies all in one trip. We also have a fabulous bakery, a butter tart factory and World's Finest Chocolate. If you like beer, we have Church Key Micro Brewery. It is definitely worth the trip. Once you have all of your treats you can picnic along the Trent Severn Waterway which runs right through the middle of Campbellford and Hastings.
From Sprucewood: This is so thoughtful of you! I'll take a look and report back. To buy more cookies, we are exhibiting at The Cobourg Waterfront Festival this Fri-Sun at the harbourfront in Cobourg. This is a great crafters event!
I hope all my Canadian readers had a wonderful and food-filled Canada Day long weekend! And Happy 4th of July to my readers South of the border. Cheers! :D